
After a prolonged period of virtual inactivity, a near enough winter hibernation, we’re getting back out in the garden.
As mentioned in a previous post, work on the jazz greenhouse is on hold again. An urgent need, both in house and garden is more and better storage space. We’re getting accustomed to living amidst levels of clutter I find discombobulating!
Doing anything at all in shed #1, which is the shed we inherited from Clive, who we bought the house from, is nigh on impossible. The clutter/mess is Biblical, and there’s simply neither enough nor the right kinds of storage to remedy the problem.
I built shed #2, which I call ‘the sentry box’, on account of its size and shape, for garden stuff: lawn mower, gardening tools, etc. That too is full to overflowing.
Shed #3 also needs to have a small footprint, as we need veg’ growing space, and we plan to build both an art studio and a ‘Hobbit hole’ guest accommodation further down our long narrow garden.
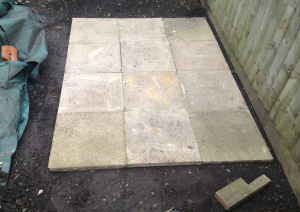
The base is 12 paving stones I got from our neighbour at no. 66, Ben, arranged 3×4. 45cm-square, these give a base approx six foot long by 4 foot wide.
I dug over and raked the soil flat, removing a certain amount of weeds and rubble, before compacting and smoothing. The slabs had ‘dot and dab’ patterns in concrete, like the #5 on a dice, on their undersides. Removing these was hard and painful work, but ultimately worth it.
I’m happy with the resulting ‘foundation’ slab.
I’ve tried to spend as little as poss on materials. Ideally it would be entirely built with free/reclaimed stuff. But in the end I’ve had to buy certain bits, such as some of the framing and cladding timber, and some paint to protect the OSB3 against rain, etc.
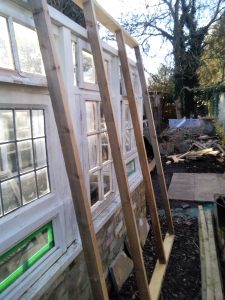
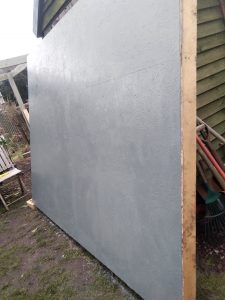
The most recent bout of work has been the framing of the front and rear panels. The front will have windows, and the rear needs fully assembling and painting before being secured in situ. Once in place it’ll be too close to our neighbours fence to be accessible to work on.
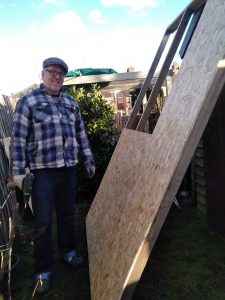
Over Friday and yesterday, Saturday, I both attached the OSB cladding to the rear framing, creating the back panel, and painted the first undercoat. Very satisfying! Today I’m hoping we’ll paint a second undercoat, and then one, poss’ even two top coats.
It’d be great if we could get the back wall up and secured, which entails attaching it to both some form of anchors and the framing of the sides/front. This would, in turn, facilitate further framing of the side walls, inc. adding a door.
Exactly what will wind up in this storage shed is moot. But the old Freecycle kiln is definitely going in, along with, we hope, our two (as yet unused) bikes, the butler sink (destined for our kitchen rebuild), the garden gates/posts (for the front garden/driveway), and, I very much hope, the detachable MX5 hard-top.
Also shifting all the electronics and speaker related stuff I got from dad, and as much sundry timber as we can manage to squeeze in, would all help free up workshop space in shed #1.
Since I first drafted and published this post, I’ve got the rear panel in position, thanks to help from our neighbour, Ken Cole. Thanks buddy! That allowed me to attach the front and rear panel with batons at the bottom, and temporary struts at the top and elsewhere.
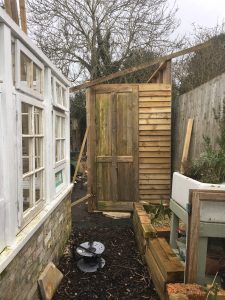
Some more cross beams have been added, to the front panel, at a level suitable for window-framing, should I go that route. And yesterday and today – 17th-18th March – I clad the right hand end in shiplap, and put the door in position, hinges and all.
I’m really happy with how this is coming along!
The roofing and other walls, and finishing clad the wall over the door, all remain to be done. And then comes time to shift a load of stuff inside, such as our as yet unused kiln (another restoration project!).
Nice!